Project Setup

This page guides you through creating your first "working" add-on structure and viewing it in-game.

If you're developing on Android, the path finding can be tricky. Consider following this alternative guide for specific steps: Android Setup Guide


The com.mojang Folder

The com.mojang folder is Minecraft's home for crucial data like Add-ons, Worlds, settings, and player information. Your development packs go directly into specific subfolders here, while saved worlds are usually found in minecraftWorlds.

Pro Tip: Create a shortcut or bookmark to your main com.mojang folder. You'll be accessing it frequently during development!

Finding Your com.mojang Folder:

The exact location varies by operating system and Minecraft version. Below are common paths. You might need to enable viewing hidden files/folders.

Windows

Windows Paths

Show Hidden Files (Windows):

Search Windows for "File Explorer Options", go to the "View" tab, and select "Show hidden files, folders, and drives". The %localappdata% path requires this.

Store Education Path

Path often used for saved worlds or packs for the Store version of Minecraft Education.

C:\Users\<username>\AppData\Local\Packages\Microsoft.MinecraftEducationEdition_8wekyb3d8bbwe\LocalState\games\com.mojang

Note: Replace <username> with your actual Windows username.

Desktop Education Path

Path often used for saved worlds or packs for the Desktop (Win32) version of Minecraft Education.

C:\Users\<USERNAME>\AppData\Roaming\Minecraft Education Edition\games\com.mojang

Note: Replace <USERNAME> with your actual Windows username.

Android

Android Path

Accessing this folder often requires a file manager app that can view Android's data directories. Permissions may be needed.

Internal Storage > Android > data > com.mojang.minecraftedu > files > games > com.mojang

The exact path under Android/data/ might vary slightly.

ChromeOS

ChromeOS Path

Show Hidden Files (Chromebook):

In the Files app, click the three-dot menu (...) > "Show hidden files". Ensure Minecraft Education has storage permissions and select "Show all Play folders" if the path isn't immediately visible under "Play files".

Requires enabling Linux (if developing there) or accessing Android storage via the Files app.

My Files > Play Files > Android > data > com.mojang.minecraftedu > files > games > com.mojang

iOS / iPadOS

iOS / iPadOS Path

Use the "Files" app. Navigate to "On My iPad" or "On My iPhone", then find the Minecraft folder.

On My iPad/iPhone > Minecraft > games > com.mojang

Direct access to development folders might be limited; importing .mcpack files is more common.

macOS

macOS Path

Show Hidden Files (Mac):

In Finder, press Cmd + Shift + . (period) to toggle hidden files. The Library folder is hidden by default.

The Library folder is often hidden. You can use Finder's "Go" menu > "Go to Folder..." and enter ~/Library/Application Support.

~/Library/Application Support/minecraftedu/Games/com.mojang

~ represents your user home directory.


Development Packs

For rapid development, we use special folders: development_behavior_packs and development_resource_packs. These live directly inside the main com.mojang folder (use the primary Windows UWP/Store path or equivalent for your OS).

Key Advantage: Changes made in these folders are automatically reloaded when you re-enter a world in Minecraft. This means faster testing without restarting the game!

The standard resource_packs and behavior_packs folders are typically for add-ons imported via .mcpack files or from the Marketplace. We'll focus on the development_ folders.


Your Workspace

In this guide, BP refers to your project folder inside development_behavior_packs, and RP refers to your project folder inside development_resource_packs.

A good workspace setup makes development much smoother. We recommend using VS Code, but you can adapt these steps for any editor.

VSCode Workspace Setup

  1. Open VS Code.
  2. Navigate to your com.mojang/development_resource_packs folder (using the paths above).
  3. Create a new folder inside named something descriptive, like my_awesome_addon_RP. This is your RP folder.
  4. Navigate to your com.mojang/development_behavior_packs folder.
  5. Create a new folder inside named similarly, like my_awesome_addon_BP. This is your BP folder.
  6. In VS Code, go to File > Add Folder to Workspace... and choose your BP folder.
  7. Repeat the previous step, adding your RP folder to the workspace.
  8. Go to File > Save Workspace As... and save the .code-workspace file somewhere convenient (like your Desktop or a projects folder). Double-clicking this file later will open both your BP and RP folders together in VS Code.

BP Manifest (manifest.json)

Creating Files/Folders: When asked to create a file (e.g., manifest.json) in a specific folder (e.g., your BP folder), make sure the folder exists first. If you need to create subfolders later (like texts), create them as needed.

The manifest file, always named manifest.json, is the heart of your pack. It tells Minecraft essential information like the pack's name, description, type, and unique identifiers. It uses JSON format. If JSON is new to you, check out a quick JSON Introduction.

In your VS Code workspace, right-click within your BP folder area and select "New File". Name it exactly manifest.json. Paste the following code into it:

BP/manifest.json
{    "format_version": 2,    "header": {        "name": "pack.name",        "description": "pack.description",        "uuid": "GENERATE-UUID-1", // <-- Replace with generated UUID        "version": [1, 0, 0],        "min_engine_version": [1, 20, 0] // <-- Updated example version    },    "modules": [        {            "type": "data",            "uuid": "GENERATE-UUID-2", // <-- Replace with generated UUID            "version": [1, 0, 0]        }    ],    "metadata": {        "authors": ["Your Name"], // <-- Optional: Add author info        "product_type": "addon" // Allows achievements if desired    }}

Important: You'll need to replace the "GENERATE-UUID-..." placeholders with actual unique IDs soon. We'll cover that next.

Manifest Explained

Key Manifest Fields

format_version
Specifies the syntax version for the manifest. Use 2 for modern packs.
header
Contains core pack information.
name, description
Pack name/description displayed in Minecraft's UI. Using keys like pack.name allows translation via language files (covered later). See the Localization Guide for details.
uuid
Critically important! A unique identifier for this specific pack header. Must be different for every pack. More below.
version
Your add-on's version number (e.g., [1, 0, 0]). Used by Minecraft to handle updates when importing .mcpack files.
min_engine_version
The minimum Minecraft version required to use this pack (e.g., [1, 20, 0]). Prevents loading on incompatible game versions.
modules
An array defining the pack's components or modules.
type
Specifies the module type. "data" indicates a Behavior Pack module.
uuid
Another critically important unique identifier, this time for the specific module. Must be different from the header UUID and any other UUIDs.
version
Version for this specific module, usually matches the header version.
metadata
Optional section for extra information.
authors
An array of author names (optional but good practice).
product_type
Setting to "addon" can potentially allow achievements to be earned while the pack is active (subject to change by Mojang).

UUID Explained

UUIDs (Universally Unique Identifiers)

A UUID is a long, randomly generated string used to uniquely identify things. In Minecraft addons, they ensure your pack doesn't conflict with others. Example: f1a2b3c4-d5e6-f7a8-b9c0-d1e2f3a4b5c6.

Absolutely Critical: Every single UUID in your manifests (header and modules, across both BP and RP) MUST BE UNIQUE. Never reuse a UUID. Duplicates will cause unpredictable errors, pack conflicts, or prevent loading.

You need to generate two unique UUIDs for your BP manifest and two more (different again!) for your RP manifest.

Use an online generator, a VS Code extension, or the simple generator below:

Generate UUID Here:

Generate four unique UUIDs. Copy and paste them into your BP/manifest.json, replacing "GENERATE-UUID-1" and "GENERATE-UUID-2". Save the file.

We'll use the other two UUIDs for the RP manifest next.

Tip: Many Bedrock development tools like bridge. can automate UUID generation.

RP Manifest (manifest.json)

Now, let's create the manifest for the Resource Pack (RP). It's very similar to the BP manifest, but the module type is "resources" instead of "data".

Create a new file named manifest.json inside your RP folder. Paste in the following code.

RP/manifest.json
{    "format_version": 2,    "header": {        "name": "pack.name",        "description": "pack.description",        "uuid": "GENERATE-UUID-3", // <-- Replace with new generated UUID        "version": [1, 0, 0],        "min_engine_version": [1, 20, 0] // <-- Updated example version    },    "modules": [        {            "type": "resources", // <-- Marks it as a Resource Pack            "uuid": "GENERATE-UUID-4", // <-- Replace with new generated UUID            "version": [1, 0, 0]        }    ],    "metadata": {         "authors": ["Your Name"], // <-- Optional: Add author info        "product_type": "addon"    }}

Remember: Replace "GENERATE-UUID-3" and "GENERATE-UUID-4" with the two new, unique UUIDs you generated earlier. Do not reuse the ones from the BP manifest!

Save the RP/manifest.json file after pasting the code and the new UUIDs.

Pack Icon (pack_icon.png)

The pack icon is the image displayed for your add-on in Minecraft's menus (e.g., world settings, global resources). It must be a PNG file named exactly pack_icon.png.

Create or find a square image (e.g., 128x128 or 256x256 pixels) that represents your pack. Save it as pack_icon.png.

Example Pack Icon

Place a copy of your pack_icon.png file directly inside both your RP folder and your BP folder.

Language Files (Localization Basics)

Remember how we used pack.name and pack.description in the manifests? To tell Minecraft what those actually mean, we need language files. This allows your pack's name and description (and later, item/block names) to be translated.

Create a new folder named texts inside both your RP folder and your BP folder.

Inside each texts folder, create two files:

Language Files Setup

  1. en_US.lang: Defines the actual text for the English (US) language. Uses a key=value format.
  2. languages.json: Lists the languages supported by your pack.

Create these files with the following content:

RP/texts/en_US.lang
pack.name=My Awesome RPpack.description=Resources for my awesome addon!
RP/texts/languages.json
["en_US"]
BP/texts/en_US.lang
pack.name=My Awesome BPpack.description=Behavior for my awesome addon!
BP/texts/languages.json
["en_US"]

Make sure the keys (pack.name, pack.description) exactly match what you used in the corresponding manifest.json files.

Learn more about advanced localization in the Localization Guide.


Checking Your Work & Test Setup

If all files are correctly named, placed, and formatted (especially the JSON!), your packs should now appear in Minecraft's pack menus when creating or editing a world.

Not Showing Up? Double-check:

  • File names (manifest.json, pack_icon.png, en_US.lang, languages.json) are exact.
  • Folder structure (texts folder inside BP and RP).
  • JSON syntax in manifest.json and languages.json is valid (use a JSON validator if unsure).
  • UUIDs are unique and correctly formatted.
  • You are looking in the correct development_ folders within com.mojang.
  • Consult the Troubleshooting guide for more help.

Enable Experiments (Required for Most Features)

Many add-on features (custom blocks/items, scripting APIs, etc.) require enabling "Experimental Gameplay" toggles when creating or editing your world. To even *see* these toggles, you often need a special UI resource pack activated globally.

Activate the Experiments UI Pack (One-Time Setup):

  1. Download the required resource pack file: experiments.mcpack
  2. Open/run the downloaded
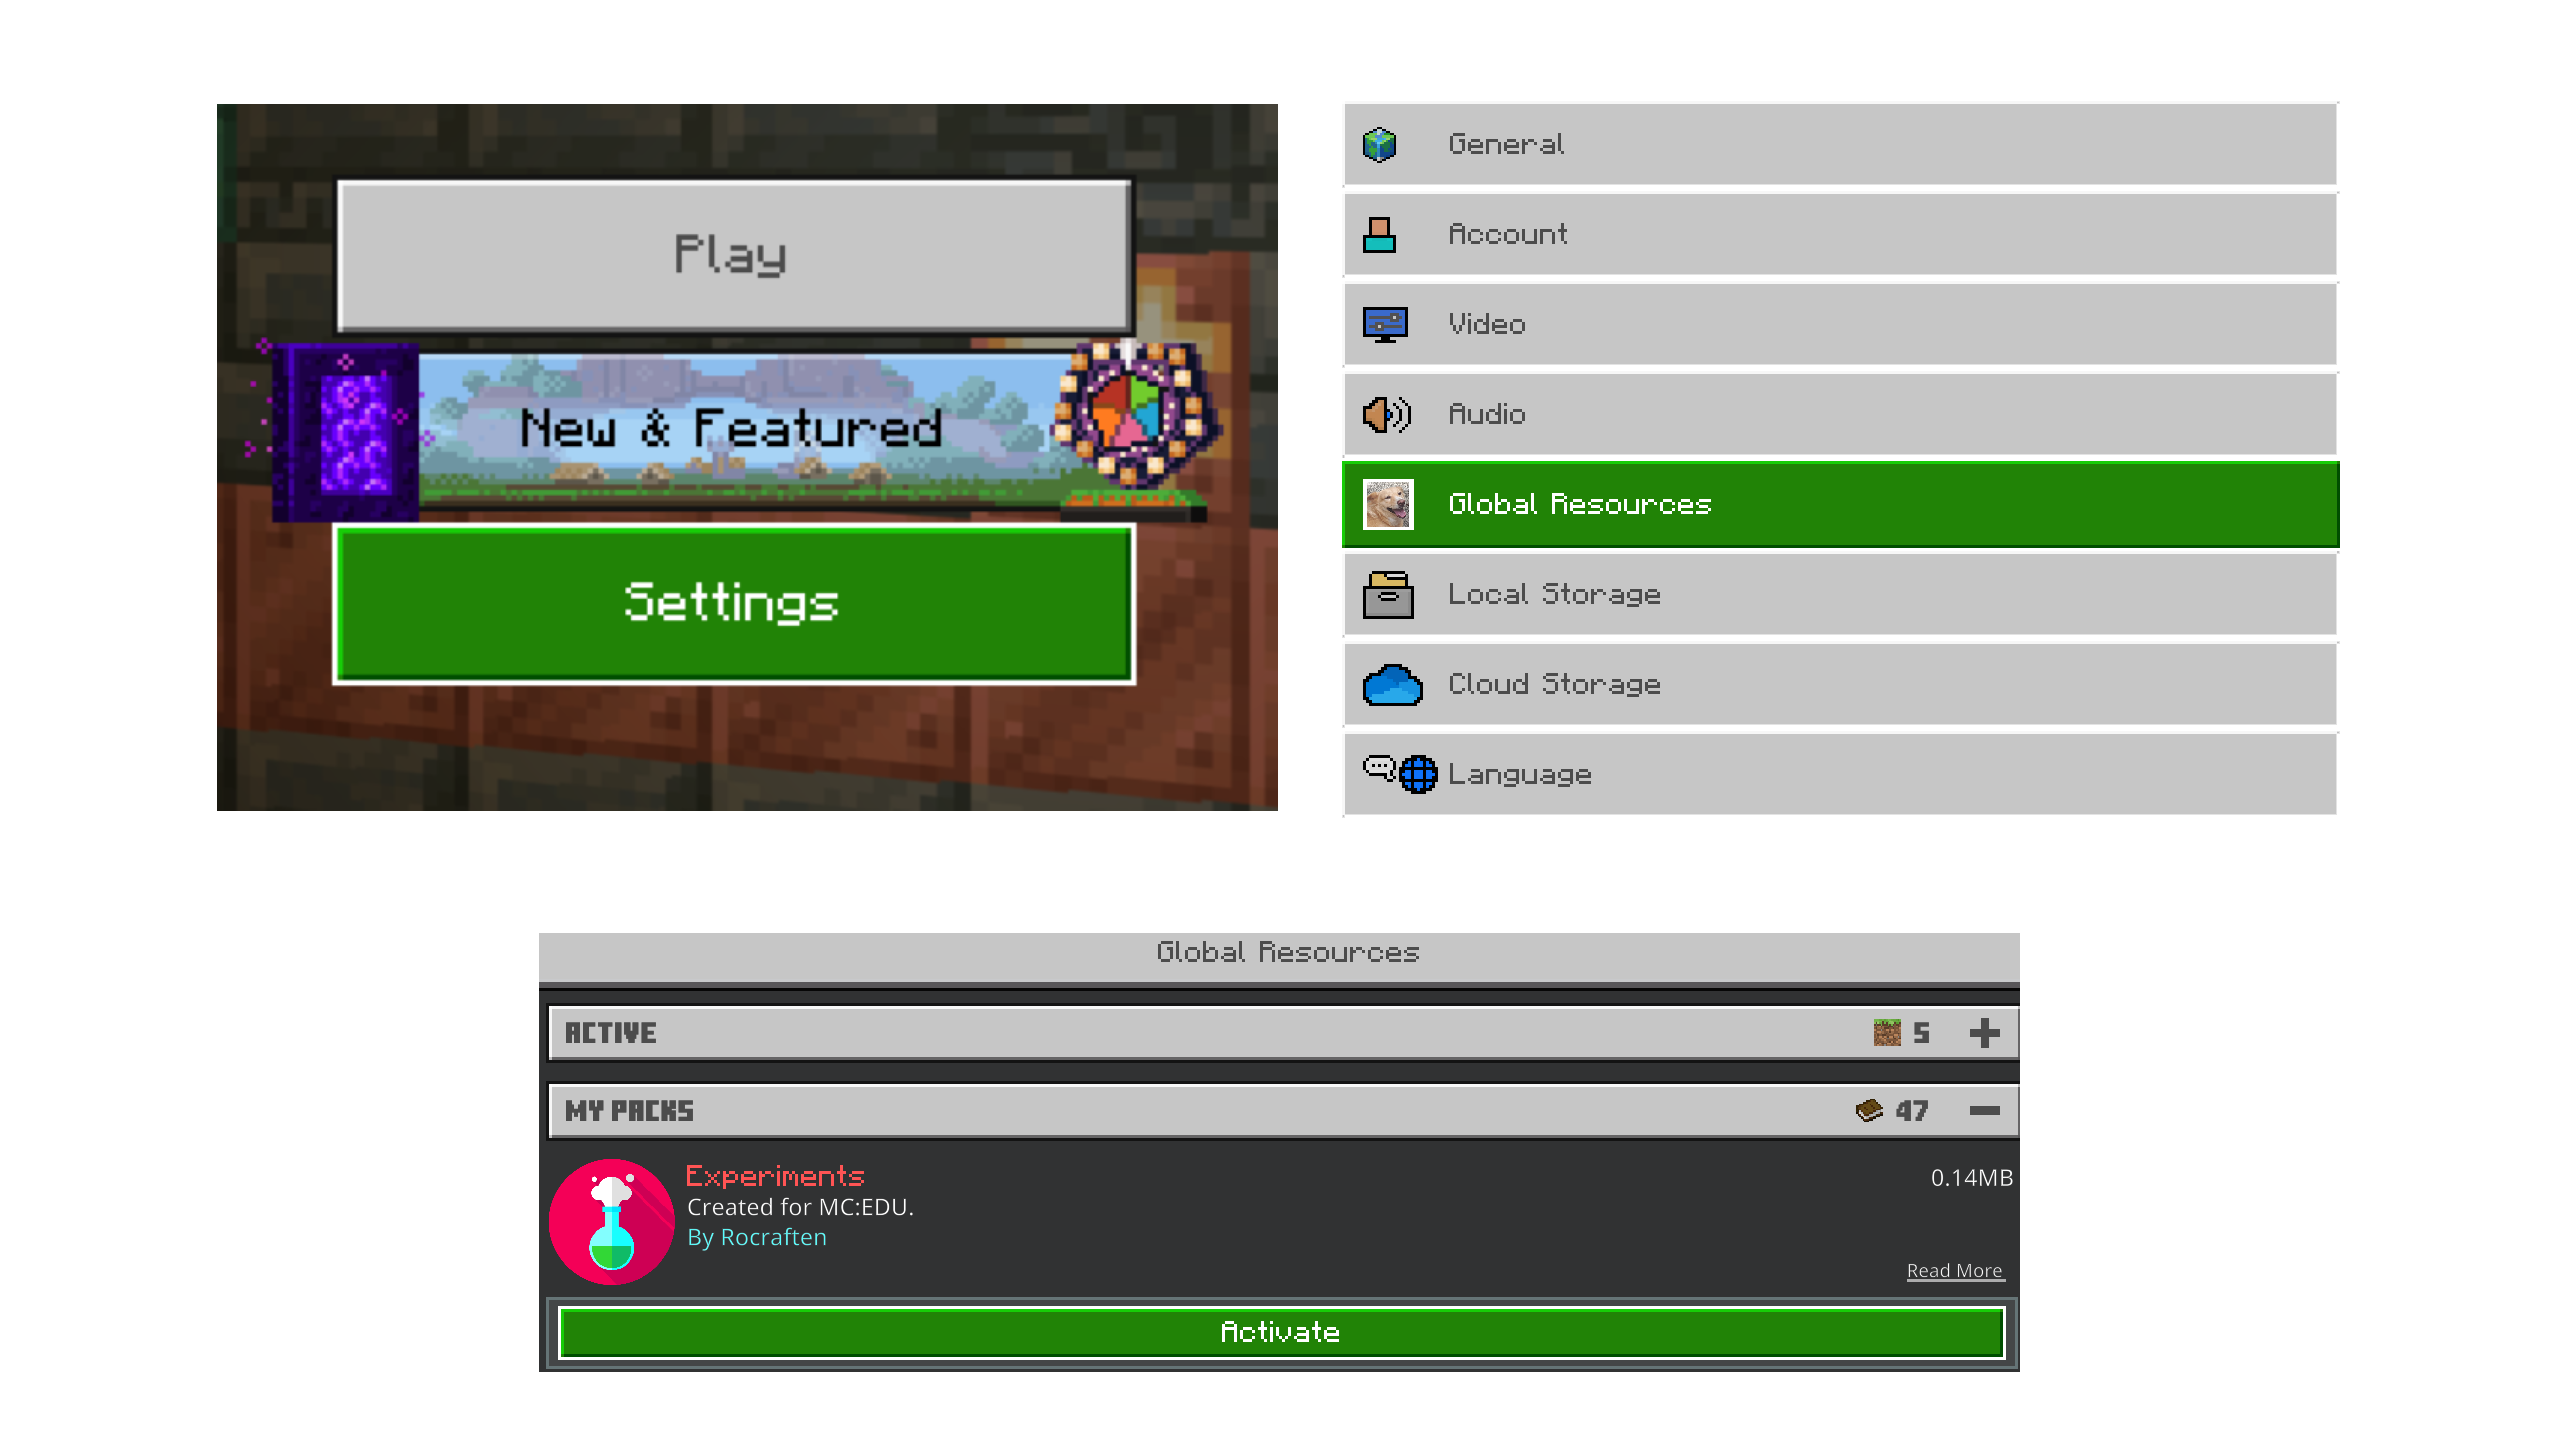
 .mcpack file. Minecraft should launch and import it automatically.
  3. In Minecraft's main menu, go to Settings > Global Resources.
  4. Under "My Packs", find the "Experiments" pack (or similar name) and click "Activate".

This pack only needs to be active in Global Resources, not per-world.

Minecraft Global Resources screen showing pack activation

With this pack active globally, the necessary "Experiments" toggles will appear in the world creation screen (shown next).


Turn on Content Log (Essential for Debugging)

Important: Close Minecraft completely before editing options.txt. Changes might be overwritten if the game is running.

The Content Log displays errors and warnings from your add-ons, making it invaluable for finding problems. You *must* enable it.

Navigate to the minecraftpe folder, which is usually located *inside* your main com.mojang folder (refer to the paths listed earlier if needed, it's one level deeper than where the pack folders are).

Path to options.txt

  • .../com.mojang/
  • minecraftpe/
  • options.txt

Open options.txt with a plain text editor (Notepad, VS Code, TextEdit, etc.). Find these lines (they might be scattered):

options.txt
... (other settings) ...content_log_file:1 # Set to 1 to enable file logging (can use lots of storage!)content_log_gui:1  # Set to 1 to enable on-screen log... (more settings) ...

Change the 0 to a 1 for both content_log_file and content_log_gui. Save the file and close it.

Now, when you run Minecraft and load a world with your packs, errors will appear on screen (GUI log) and potentially be saved to a log file (file log). The GUI log is usually sufficient for active development.


With the setup complete, create a new world specifically for testing your add-on using these settings:

Recommended World Settings for Testing

  1. Launch Minecraft and click "Play" > "Create New" > "Create New World".
  2. Give your world a name (e.g., "Addon Testing").
  3. Set Default Game Mode to Creative (easier to test items/features).
  4. Difficulty: Peaceful (optional, prevents mobs interfering).
  5. World Options: Consider enabling "Show Coordinates".
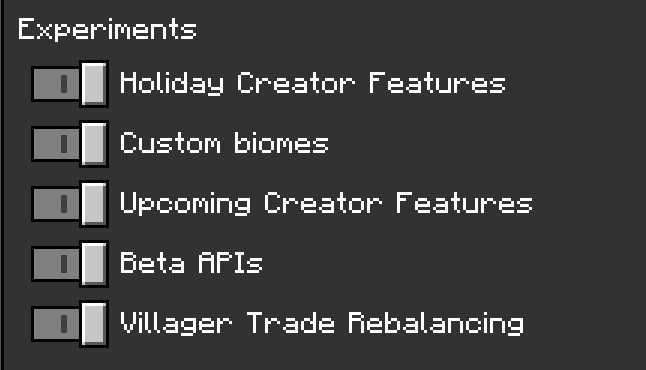
  6. Scroll down to the "Experiments" section (visible thanks to the global UI pack). Enable the toggles relevant to your add-on's features (e.g., "Holiday Creator Features", "Beta APIs"). Start with these if unsure.
  7. Minecraft create new world screen
  8. On the left sidebar, go to "Behavior Packs". Under "Available", find your pack (e.g., "My Awesome BP") and click "Activate". Confirm if prompted.
  9. Go to "Resource Packs". Under "Available", find your pack (e.g., "My Awesome RP") and click "Activate".
  10. Minecraft UI showing activation of addon packs in world settings
  11. Click "Create"!

Project Structure Overview

After following these steps, your project folders within development_resource_packs and development_behavior_packs should look like this:

Final File Structure

  • my_awesome_addon_RP/
  • manifest.json
  • pack_icon.png
  • texts/
  • en_US.lang
  • languages.json
  • my_awesome_addon_BP/
  • manifest.json
  • pack_icon.png
  • texts/
  • en_US.lang
  • languages.json

What You Have Learned

  • Locating the crucial com.mojang folder on different platforms.
  • Understanding the purpose of development_behavior_packs and development_resource_packs.
  • Setting up an efficient VS Code workspace for BP and RP development.
  • Creating and understanding the essential manifest.json file for both pack types.
  • The critical importance of generating and using unique UUIDs.
  • Adding a visual identity with pack_icon.png.
  • Implementing basic localization using texts/en_US.lang and texts/languages.json.
  • Enabling the Experiments UI globally for access to advanced features.
  • Turning on the Content Log via options.txt for essential debugging.
  • Creating a dedicated testing world with necessary experiments and packs activated.

Next Steps

Congratulations! You've successfully set up the fundamental structure for a Minecraft Education Edition add-on. Now it's time to add some custom content. Let's start by creating your first custom item.

Next: Create a Custom Item