Create a Custom Item
In Minecraft, we can create custom items, which can be dropped, traded, crafted, and otherwise used like a normal item. There is a lot of power in the system, including the ability to make food, fuel, and tools.
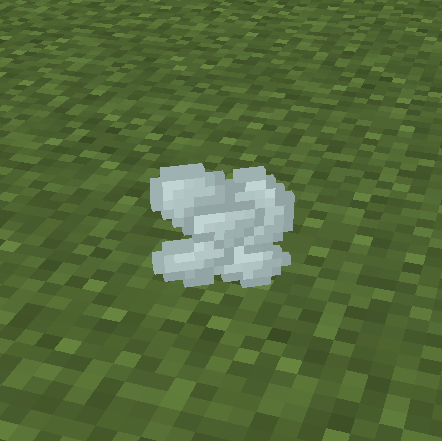
In this tutorial we are going to learn how to create a simple "ectoplasm" item, which we will later use as a loot-table drop for our ghost entity.
Concept: Items are made up of two main parts:
- The visuals (texture, name, icon).
- The behaviors (how the item acts, e.g., stack size, enchantability, usage).
First, we will learn how to create a new simple item & define its behaviors. In the next section we will assign a texture to this item, so you can see it in game.
Item Behavior
To make an item we will need a way to identify it and define how we want it to behave. To do this we will be making a file which tells Minecraft to apply certain behaviors to a specific item of our choice.
At the end of this section we will have fully defined the behavior of our item.
Components
Different items behave differently; you can eat a porkchop, enchanted items glow & eggs can only stack to 16. These are all examples of how the item behaves. We are able to define how our custom item will behave by using behavior components.
Example Components
Components contain information which tells the game what our item should do. Each component typically has a value attached to it which we can edit.
"minecraft:glint": true- Determines whether the item should have an enchanted glint."minecraft:max_stack_size": 16- Sets the maximum stack size for the item."minecraft:use_duration": 32- How long (in ticks) it takes to 'use' the item (like eating).
Many more components exist for different behaviors!
For our ectoplasm, we want it to stack up to 16, similar to eggs. To do this we use the component "minecraft:max_stack_size" and set its value to 16.
Identifier
In order for the game to apply the correct components to the correct item, we need to be able to tell the game which item is ours. We do this by defining an identifier for our item.
An identifier is a name unique to this item. For a vanilla Minecraft egg, its identifier is minecraft:egg. An identifier is made of two parts, separated by a colon (:):
- The namespace (e.g.,
minecraft) - The ID (e.g.,
egg)
Namespaces are crucial! They prevent conflicts if multiple add-ons add items with the same ID (like 'ectoplasm'). Your namespace should be unique to your project or organization (e.g., your initials, a short project name). We'll use wiki for this guide.
Read more about namespaces here.
The ID is an informative shorthand name for your item. We will use ectoplasm.
Together, our custom identifier becomes wiki:ectoplasm. We will use this identifier when we want to reference our item, for example using the /give command.
Item File
Now that we have our components and identifier, we can define our item in a JSON file within our behavior pack. This file tells Minecraft how the item should function.
All item definition files go in the BP/items/ folder. Create this folder if it doesn't exist. The name of the JSON file itself doesn't affect gameplay, but naming it after the item's ID (e.g., ectoplasm.json) makes navigation easier.
Create a file named ectoplasm.json inside BP/items/. Here is the basic structure:
{ "format_version": "1.21.0", "minecraft:item": { "description": { ... }, "components": { ... } } } Most behavior pack files have two top-level keys: "format_version" and a key identifying the file type (here, "minecraft:item").
"format_version": Specifies the version of the Add-on system syntax Minecraft should use. We'll use"1.21.0"(adjust if needed for your target Minecraft version). Learn more about format versions here."minecraft:item": Contains all the data defining this item. It always includes a"description"and usually"components".
Let's look closer at the "description" block:
"description": { "identifier": "wiki:ectoplasm", "menu_category": { "category": "items" } }, "identifier": This must match the unique identifier we decided on ("wiki:ectoplasm")."menu_category": (Optional) Defines where the item appears in the Creative inventory. Options are"construction","equipment","items", and"nature". If omitted, the item won't appear in Creative but can still be obtained via commands like/give.
Now, let's add our behavior component under the "components" block. We simply list the component names as keys and their desired values:
"components": { "minecraft:max_stack_size": 16 } Find more item components in our detailed Item Components Guide.
With that, we have fully defined our item's behavior! Your complete BP/items/ectoplasm.json file should now look like this:
{ "format_version": "1.21.0", "minecraft:item": { "description": { "identifier": "wiki:ectoplasm", "menu_category": { "category": "items" } }, "components": { "minecraft:max_stack_size": 16 } } } Test It (Partially): If you load Minecraft with your add-on now, you should find an item in the "Items" category of the Creative inventory. It will likely have a weird name (like item.wiki:ectoplasm.name) and no texture (appearing as a purple/black checkerboard). However, if you try to stack it, it should correctly stack up to 16!
In the next section, we'll define the item's texture and name so it looks right in-game.
Item Visuals
Now that we have an item that works, we want to add a texture and name to it. Visuals are handled by the Resource Pack (RP).
Textures are stored as image files. To tell Minecraft which texture belongs to which item, we assign a unique "shortname" to each texture path.
Texture
First, you need an image file for your item. For our ectoplasm, you can download an example texture:

Download the ectoplasm texture file:
ectoplasm.pngAll item textures belong in the RP/textures/items/ folder. Create these folders if they don't exist. You can create further subdirectories inside items/ if you like (e.g., RP/textures/items/magic/ectoplasm.png).
Place your downloaded ectoplasm.png inside RP/textures/items/.
Texture Tips:
- Standard Minecraft item textures are 16x16 pixels.
- Use PNG format with transparency.
- Keep file names consistent (e.g., match the item ID:
ectoplasm.png). - Other formats like
.tgaare sometimes supported, but PNG is recommended.
Your resource pack folder structure should now include:
RP Texture Structure
- RP/
- textures/
- items/
- ectoplasm.png
- ... (other RP files)
Shortname
A shortname acts like a nickname for your texture's file path. Instead of writing textures/items/ectoplasm every time, we'll define a shortname (like wiki:ectoplasm) and use that instead.
All item texture shortnames are defined in a single file: RP/textures/item_texture.json. Create this file if it doesn't exist.
Here's the basic structure of item_texture.json:
{ "resource_pack_name": "Ghostly Guide", "texture_name": "atlas.items", "texture_data": { ... } } "resource_pack_name": Can be anything, often the name of your pack."texture_name": Must be"atlas.items"for item textures."texture_data": An object containing all your shortname definitions.
Inside "texture_data", we define our shortname like this:
"wiki:ectoplasm": { "textures": "textures/items/ectoplasm" } "wiki:ectoplasm": This is the shortname we are defining. It's best practice to make it match the item's identifier for clarity."textures": The value is the path to the texture file, relative to theRP/folder, **without the file extension** (.png).
Now, whenever Minecraft needs the texture for the shortname wiki:ectoplasm, it knows to look for RP/textures/items/ectoplasm.png.
Icon Component
To finally link the texture (via its shortname) to the item's behavior definition, we go back to our BP/items/ectoplasm.json file.
Add the "minecraft:icon" component inside the "components" block. Set its value to the shortname you just defined in item_texture.json:
"components": { "minecraft:max_stack_size": 16, "minecraft:icon": "wiki:ectoplasm" } Test Again! Reload your world. Your custom item should now display the correct texture in your inventory and when dropped!
Item Name
The last step is giving our item a proper display name. Currently, it probably shows up as something like item.wiki:ectoplasm.name. This is the item's default translation key.
To define what this key means in English (and potentially other languages later), we need to edit the .lang files in the texts folders of **both** our Behavior Pack and Resource Pack. We created these in the Project Setup guide.
Add the following line to **both** RP/texts/en_US.lang and BP/texts/en_US.lang:
item.wiki:ectoplasm=Ectoplasm The format is translation.key=Displayed Text. Make sure the key exactly matches the default name Minecraft was showing.
Final Test! Reload your world one last time. Your item should now have the name "Ectoplasm", the correct texture, and stack to 16!
Overview
Congratulations! Your first custom item, Ectoplasm, is complete! If everything has been done correctly, the item should now be obtainable through the /give @s wiki:ectoplasm command in-game, appear correctly named and textured in your creative inventory (under "Items"), and stack to 16.
Your final folder structure should include these new files:
Project File Structure Update
- RP/
- textures/
- item_texture.json (New/Edited)
- items/
- ectoplasm.png (New)
- texts/
- en_US.lang (Edited)
- languages.json
- manifest.json
- pack_icon.png
- BP/
- items/ (New)
- ectoplasm.json (New)
- texts/
- en_US.lang (Edited)
- languages.json
- manifest.json
- pack_icon.png
Final Code Files:
Full ectoplasm.json
{ "format_version": "1.21.0", "minecraft:item": { "description": { "identifier": "wiki:ectoplasm", "menu_category": { "category": "items" } }, "components": { "minecraft:max_stack_size": 16, "minecraft:icon": "wiki:ectoplasm" } } } Full item_texture.json
{ "resource_pack_name": "Ghostly Guide", "texture_name": "atlas.items", "texture_data": { "wiki:ectoplasm": { "textures": "textures/items/ectoplasm" } } } If you're having trouble, check the Troubleshooting page. If that doesn't help, compare your results with the example files
Your Progress So Far
- Setup your pack structure
- Create a custom item (Ectoplasm)
- Format behavior (
.json) and resource (item_texture.json,.lang) files for an item - Understand item components and how to use them
- Define an item's texture using shortnames
- Set an item's display name using language files
- Create a custom entity
- Create loot tables, spawn rules, and recipes
Next Steps
Now that you have a custom item, the next logical step is to create a custom entity (like our Ghost) that might drop this item!
Next: Create a Custom Entity